Hello guys in this tutorial lets see how to make
an simple line follower robot with single infra-red sensor.


Usually for beginners in Robotics this is your first
robot to play with Since this robot has some basic functions and basic
programming learning this is like learning the A,B,C,D.... of Robotics.
A line follower is an autonomous Robot which
is able to follow a line (black or white) and alter its path based on the shape
of the line.

COMPONENTS NEEDED:
- Arduino UNO
- one IR-sensor module
- L293D motor driver
- metal chassis
- 2x BO motors
- 1x caster wheel
- 2x wheels
- 2x 9v battery
- 2x dc battery connectors
- connecting wires


The chassis is the body of this Robot, Arduino
is the brain of this robot and two dc motors produce motion.
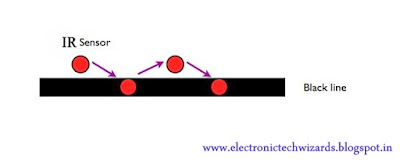
HOW IT WORKS?!
This is a simplest bot with a single sensor so
its working principle is also as simple as follows..
- when the IR sensor sees the black line one wheel of the bot rotates and the bot turns away from the line.
- when the IR sensors sees the white background the other wheel rotates and the bot turns slightly towards the line.

The above two steps occurs one after other in a
repeat mode very fastly in a very short time which gives us the movement of the
bot in the path following the black line.
It just follows the Z pattern turning towards the
line and turning away from the line.
LETS MAKE THE ROBOT:
STEP 1:
Fix the wheels on the metal chassis and mount the Dc
BO motors on the back wheels and fix a caster wheel in the front.
connect the L293D motor driver with the arduino and
dc motors.
CONNECTIONS:
3,6(l293d) to left motor(output)
11,14(l293d) to right motor(output)
2,7,10,15(l293d) to pins 10,11,5,6 of Arduino(inputs)

Note: if the robot doesn't turn in the particular side of curves properly swap the motor pins connections and try it out.
STEP 2:

Connect your Arduino to your IR sensor.
- connect out pin of IR to pin 2 of Arduino
- connect vcc of IR to 5v of Arduino
- connect gnd of IR to gnd pin of Arduino.
STEP 3:
The programming part....
Interface your arduino with arduino IDE software
and upload the below program.

int lmotorpin1=5;
int lmotorpin2=6;
int rmotorpin1=10;
int rmotorpin2=11;
int sensor=2;
int sensorstate=0;
void setup(){
pinMode(sensor,INPUT);
pinMode(lmotorpin1,OUTPUT);
pinMode(lmotorpin2,OUTPUT);
pinMode(rmotorpin1,OUTPUT);
pinMode(rmotorpin2,OUTPUT);
}
void loop(){
sensorstate=digitalRead(sensor);
if(sensorstate==HIGH){
digitalWrite(lmotorpin1,HIGH);
digitalWrite(lmotorpin2,LOW);
digitalWrite(rmotorpin1,LOW);
digitalWrite(rmotorpin2,LOW);
}
else{
digitalWrite(rmotorpin1,LOW);
digitalWrite(rmotorpin2,HIGH);
digitalWrite(lmotorpin1,LOW);
digitalWrite(lmotorpin2,LOW);
}
}
DOWNLOAD PROGRAM:click here
STEP 4:
connect the power supply to your Arduino and motor
driver....
YOUR BOT IS READY TO RACE.......

hey 9V battery part is not clear to me. how to connect the two batteries to the final circuitry
ReplyDeleteHey, Thank you so much for this post. Its really helpful.
ReplyDeleteNano-D connectors
Micro-D connectors
Will the robot turn right and left according to the line?
ReplyDeletePlease reply fast.
This comment has been removed by the author.
ReplyDeleteI am getting "redefinition of 'void setup()'
ReplyDeleteerror, How can I solve
its because u have pasted the prgram without clearing the screen of the ardiuno software.....first delete everything provided initially in the screen and then paste this code there...
DeleteThe code makes no sense
ReplyDeleteYou possibly can learn even more in relation to excess skin in other places. https://imgur.com/a/53OsjMX https://imgur.com/a/YknwCTq https://imgur.com/a/v1BBpod https://imgur.com/a/MHPpVUh https://imgur.com/a/xDouGB1 https://imgur.com/a/1u34ASz https://imgur.com/a/0E0n5yD
ReplyDelete